Documentation
| Site: | Share @ NMU |
| Course: | Share Documentation |
| Book: | Documentation |
| Printed by: | Guest user |
| Date: | Sunday, May 5, 2024, 7:20 AM |
Description
a
Getting Started
A sample home page for a group is show below. Down the left and right sides of the screen are blocks that are used to navigate through the site. These blocks contain news or announcements for the group. Some examples of blocks include: Calendar, Navigation, Recent Activity, Search Forums, and Upcoming Events. Click here to see a complete list of blocks and their descriptions.
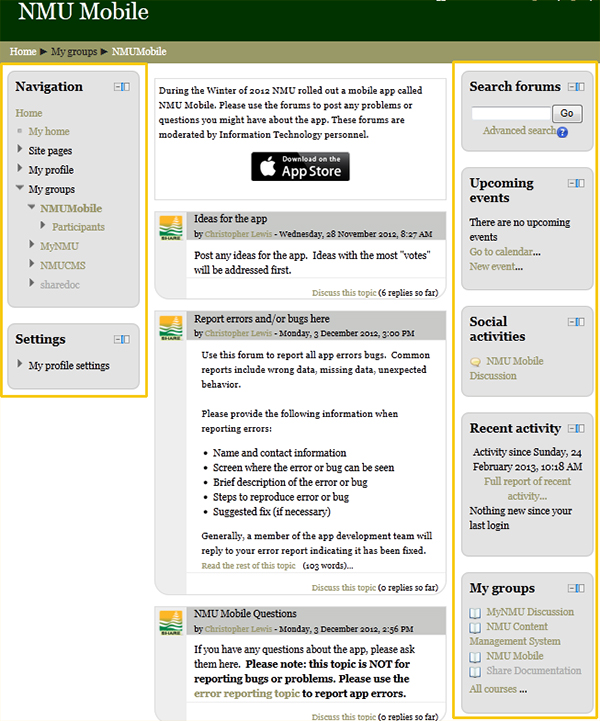
The main blocks on the home page include:
- Navigation block
- My home User's personal dashboard
- Site Pages Site wide pages and resources. Examples: blogs and calendars
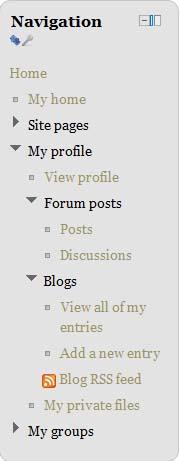
- My profile View your profile, posts, blogs, messages, private files (seen only by you)
- My groups All groups of which you are a member.
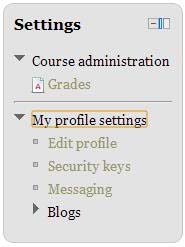
- Settings block
- My profile settings
You can navigate between pages in Share by using the breadcrumb bar, highlighted in the image below.

In this example, clicking Home would bring you to a list of groups.
Working In Your Group
This Section will describe how to interact in this group.
Activities and Resources
The owner of this group could have added various activites and resources. To learn more about these follow the links below.
Activities
An activity is a part of the group where members can interact. You may find some of these in your group.
| Assignments | Enables the group owner to upload a file and grade and comments on the responses |
| Chat | Allows participants to have a real-time synchronous discussion |
| Choice | A group owner asks a question and specifies a choice of multiple responses |
| Database | Enables participants to create, maintain and search a bank of record entries |
| External Tool | The external tool enables Moodle users to interact with a new activity type or learning materials from a publisher. |
| Feedback | The Feedback module allows you to create and conduct surveys to collect feedback. |
| Forum | Allows participants to have asynchronous cpmmunications |
| Glossary | Enables participants to create and maintain a list of definitions, like a dictionary journal |
| Lesson | For delivering content in flexible ways |
| Quiz | Allows the group owner to design and set quiz tests, which may be automatically marked and feedback and/or to correct answers shown |
| Survey | For gathering data from participants to help teachers learn about their class and reflect on their own teaching |
| Wiki | A collection of web pages that anyone can add to or edit |
| Workshop | Enables peer assessment |
Resources
You may find some of these resources in your group also. Click the link to learn more.
|
Multi-page resource with a book-like format |
|
|
A picture, a pdf document, a spreadsheet, a sound file, a video file |
|
| For helping organize files and one folder may cotain other folders | |
| Add static material from other sources in the standard iMS content package format | |
| Can be a few displayed words or an image used to separate resources and activiites ina topic section, or can be a lengthy description or insructions | |
| The student sees a single, srollable screen that a teacher creates with the robust HTML editor | |
| You can send the student to any place they can reach on their web browser |
Blogs
You can view blogs under My Profile in the Navigation pane.
Enable external blogs
Enables users to specify external blog feeds. Moodle regularly checks these blog feeds and copies new entries to the local blog of that user.
Blocks
There are a number of blocks that will appear on the left and right side of the screen. These blocks contain news or announcements for your group. Some examples of blocks include: Calendar, Navigation, Recent Activity, Search Forums, and Upcoming Events. Click here to see a complete list of blocks and their descriptions.
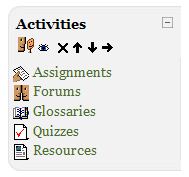
Activities block
The activities block shows you all the activities available in a group.
Participants block
Some courses will show a block that lists all the members in the group.
Forums
Access The Forum
Use the links in either the Topic Outline or Activities block.

Once in the forum, click the Add a new discussion topic button. ![]()
If your group opens to the forum page, go to the Reply to a Post Section below.
Post To A Forum and Attach a File
Type in a subject title and message.
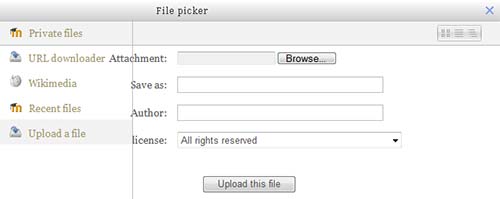
If you choose to attach a file, click the Add button in the gray box right below Attachment. ![]()
Click Upload a file. Browse to your file and click the Upload this file button.
Click the Post to forum button at the bottom of the page.![]()
You will receive a message indicating the post has been successfully submitted to the discussion.
You have thirty minutes to alter this post (unless the forum deadline ends before that thirty minute period). After the thirty minutes or once the forum is closed, you will not have the opportunity to go back and correct your submission.
Reply To A Post
If you want to reply to a post, click the link to the post to which you wish to reply. The post will start with a brief subject line followed by the text of the post. Below that is a Reply link.
Clicking this link will open a dialog box for your response. The subject line is automatically filled with your classmate's title. Once you've entered your response, click the Post to forum button near the bottom of the screen. Your reply will appear indented below your classmate's original post to create a thread that clearly differentiates posts from replies. Again you will have thirty minutes to edit or delete your reply. As with your original posting, you can include an attachment to your response if appropriate using the Browse button beneath the message.
Be sure to note the Forum deadline. Once the deadline is past, Share will not provide an opportunity to add a new discussion post or to reply to a post.
Glossary
The Glossary allows group members to view a list of definitions, like a dictionary.
Accessing the glossary
Glossary links are available in the activitie block as well as in the pertinent group section. Clicking the specific glossary will open the glossary and will allow you to browse or search for glossary entries.
Adding entries
Open the glossary. New entries are added using the Add a new entry button, which opens a new entry screen. (If the Add a new entry button is not there, you do not have rights to add entries.) Enter the word you want added to the Glossary in the Concept field and enter the definition in the text box. For more information about adding entries, click here.
Saving the entry
Clicking the Save changes button will add the term to the glossary.
Browse options
Open then glossary. On the screen are tabs for browsing the glossary. They include:
- Browse by alphabet
- Browse by category (if there are any categories added)
- Browse by date (you can sort entries by last update or by creation date)
- Browse by author

Example: Glossary Browsing Options
Search options
Open the glossary. At the top of the screen you will see a search box. Checking the 'Search full text' option (on the right side of the Search box) allows searching for a given word in any position in the text. This can take longer and return more entries than you might wish, but it is thorough. If you do not check the Search full text box, the search only looks for the term names. The index below lets you browse the glossary according to a given letter.
Printing a glossary
At the top right of the main glossary page, you'll see a little printer icon. If you click the icon, Share will open a new browser window and present all the words and definitions in a printer-friendly format.
To print the glossary:
- Click the printer icon at the top of the main glossary page.
- From the newly opened window, choose Print from the File menu of your browser.
- Once the word list has printed, close the printer-friendly format window.
Note: if no printer icon appears on the main glossary page, the group owner has elected to prohibit printing from the glossary.
Help
There are built-in help screens. Clicking the ![]() help icon will popup a relevant help window.
help icon will popup a relevant help window.
Using the Text Editor
The text editor (sometimes referred to as the 'HTML editor' or even 'TinyMCE') has many icons to assist the user in entering content. Many of these icons and functions should be familiar to anyone who uses a word processor. Some examples of where you will see the text editor include: Editing Section headings, description of an activity, writing an answer to a quiz question or editing the content of many blocks.
List of groups
For those who are not familiar with the tool bar, here are the functions listed by group using the above example. Remember that the site administrator can edit or provide additonal toolbars.
Row 1
 - Font, size and heading group
 - Undo and Redo group
 - Find and Replace group
 |Full screen toggle
Row 2
 - Text effect group
 - Line format group
 - Formatting group
 - Color group
 - Paragraph group
Row 3
 - Number and Bullets and indents
 - Link group
 - Insert group
 - HTML source toggle & spellchecker
Special features
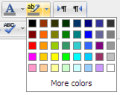
Color pickers
There are four levels of selecting a font or background color,
- A quick pick 5x8 matrix of colors
- "More colors" that links to Picker, Pallet and Named tabs
-
A quick pick 5x8 matrix of colors
-
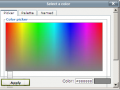
A rainbow color picker tab
-
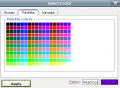
A Pallet tab with a 18x12 matrix of colors
-
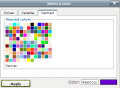
A Named tab with custom pallets
Insert images and media
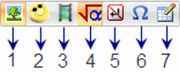 The Insert images and media group
- 1 Insert Image - uses File picker
- 2 Insert Emoticon (only visible if the site administrator has enabled the "show emoticons as images" filter in Settings>Site administration>Plugins>Filters>Manage filters)
- 3 Insert Media - uses File picker
- 4 Insert Equation - uses java script editor
- 5 Insert Non breaking space
- 6 Insert Custom character - Special keyboard characters
- 7 Insert Table -
-
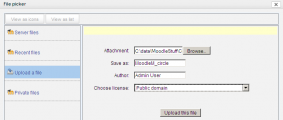
File picker Upload file screen
-
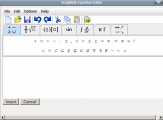
Equation editor
-
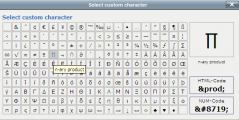
Custom character selector
Insert table
-
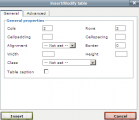
General tab
-
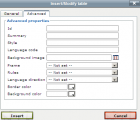
Advanced tab
To add borders to a table
Cell borders are crucial for helping readers to follow the rows across the screen. If they aren’t showing already you can add them as follows:
- In the Wiki page containing your table, click its Edit tab
- Carefully select all the cells of the table
- Then right click (Macs: Command+click or Ctrl+Click) over any part of your selection to get a context menu; from it select Cell > Table Cell Properties; the cell properties dialog box then loads.
- Click on its Advanced tab, set Border Color to black (for instance), then click Apply, and then click Update.
- Click Save; the Wiki page containing your table will then load displaying its borders.


Manage your Profile
Your Profile
Your profile contains information about you that other users can see by clicking on your name. Profile information includes the description of yourself (if you have entered one) your name, location, email address (if you chose to make it accessible) and the list of groups you are enrolled in and a picture. You can edit your profile by clicking edit profile in the setting block.
Updating your Profile
Please update your profile when information changes. It is important that your current email address is correct because it is used when you subscribe to forum and have emails automatically sent when new messages are posted.
There are several settings that are accessible from your profile that will help make your use of Share more productive.
-
Email format: You can choose to have emails sent from Share in Plain text format or Pretty HTML format. HTML format will include images and the color scheme in emails, but will be slightly larger in size.
-
Forum auto-subscribe: If you select yes for this it will mean that when you post a message to a forum, you will be subscribed to that forum and receive email copies of all messages for that forum. You may unsubscribe from forums if you wish as well.
-
Email digest type: You may choose to receive all emails from Share in one daily message. There is also the option to receive either the complete message or just the Subjects from forums you subscribe to.
-
Forum tracking: This is a useful option to enable. If it is enabled on your Share course it will highlight unread forum messages so you can easily see what is new.